Saturday, June 18, 2011

4th of July Fun Banner


Hope everyone is doing great !!! Here in Puerto Rico, the temperatures have started to soar and it is really, really hot. We just had a swimming pool installed and I haven't been able to get in due to a terrible sore throat and coughing. I think I will be ok by Fathers Day ( I hope!).

As I did last summer, I will be going into a crafting hiatus, because my 2 military boys will be home for vacation; one in June and the other in July. Brandon, the one that recently joined the ARMY, will be marrying his high school sweetheart when he comes. I am finishing the invites, will make the cake, and will make handmade soap as favors. YAAAYYY !!!

Today's project is a fun, festive, and patriotic banner for the 4th of July.
  • RECIPE:
    • cartridges:
    • White cardstock
    • blue cardstock
    • red cardstock
    • curling ribbon
    • 3/4 inch circle punch (to cover the staple that attaches the ribbon curls)
    • 2 sided REMOVABLE tape
  • Print and cut flags ( I made 7)

  • With the "cut Only" feature selected, cut the banner with its shadow, and layer together.


  • Affix the flags to each pennant with removable tape. I did this with removable tape, so that I can use the pennants for a different occasion if I wish to.


  • I made 7 pennants and threaded curling ribbon through the holes.
    • I then made some cute "tails" of curling ribbon and attached them with mini staples to each pennant. I covered the staples with  red cardstock circles. These will be extra fun for my grandson to look at.


THANK YOU so much for looking. I will try to post pictures of the things I am making for my son's wedding. :)

Saturday, June 11, 2011

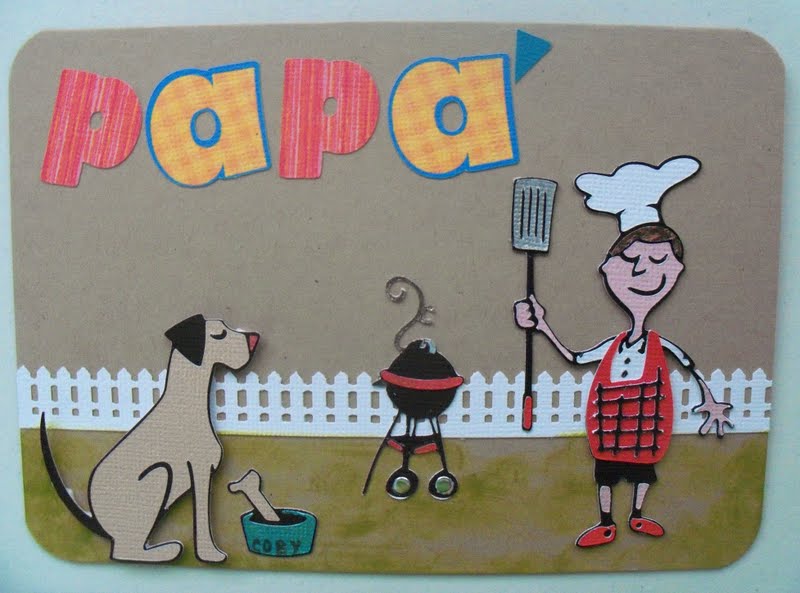
My Dad, the King of The Grill !!! Fathers Day card.


Hello everyone !!!! I made this card for my little grandson Santiago for him to give to his daddy on Fathers Day. My Son in Law is a Stay at Home Dad until his results from the USMLE come in and may I say, his is the greatest dad ever !!!! My grandson adores him. Also, he makes the best grilled pork tenderloin in the planet. And, that is the theme for his card. You may notice that on the card, their dog Coby is waiting to taste the meat, just like in real life. LOL !!!!

    • Martha Stewart Fence border punch
    • Imaginisce Heat Setting Tool and gems
    • Sakura Glitter Pens
    • Green ink dabber
    • pop dots for dimension
    • Corner Chomper
    • American Crafts white cardstock
    • Stampin Up Kraft cardstock
  • Print and cut the shapes needed. Add embellishments.


  • Make a card base 5x7 (folded) from kraft cardstock.
    • Glue the white fence to it.
    • Ink/color the bottom part of the card with green ink.
  •  Glue the words "PAPA" (or DAD) to the card. Use dimensional dots to glue the other images.


THANKS FOR STOPPING BY. HAVE FUN CRAFTING FOR FATHERS DAY !!!!!

Saturday, June 4, 2011

Fathers Day Gift: End of the Day Personal Items Holder.


Hello everyone and happy Saturday !!! The project I made for today is very, very practical and, it can be used for teenagers, young adults and dads, alike. It is a tray where guys can put in their cel phone, keys, loose change, glasses, wallet, etc. At my house, I have to pick up those items from the dinning table, every day. This one I made for my son (who is not a dad.. not even married LOL). I designed it having in mind his major interest in life: music and his guitar. I used printable vinyl to decorate the tray.
  • RECIPE:
    • cartridges:
    • Cricut Printable vinyl
    • candle tray (from Walmart)
    • twine
    • glue gun
  • Cut and print a square with the stave pattern on printable vinyl. Let it dry a few minutes and remove only the vinyl, leaving the backing on the mat.


  • Adhere the printed vinyl to the tray.


  • Cut and print the guitar. Layer it.

  • Affix the guitar to the label. Glue twine to the tray with a glue gun.


Thanks for stopping by and have fun creating your personalized gifts for Fathers Day !!!!

Saturday, May 28, 2011

Father's Day "Wild West" Cupcake Toppers and Goodie Bags.


I just can't believe how fast this year is going !!!! OMG !!! Father's Day already ????? Well.... you better believe it, in only three more weeks, it will be here! To make it easier on you, I am bringing you some some inspiration for your Father's Day projects.
I made some Cowboy themed cake toppers and goodie bags. These can be used for other occasions like BBQ's, boys birthdays, and school parties. I took these goodies to a party at my grandson's Day Care, so you can see how versatile this theme is. Here is my little cowboy:


  •  RECIPE:
    • cartridges: Old West: I used this cartridge to cut tha cake toppers and the goodie bag horses.
    • Spellbinders Nestabilities: Classic Oval Large
    • hemp twine
    • brown lunch bags
    • wooden craft sticks
    • white gel pen (to fill in the details in cut outs)
    • Crop A Dile: to make the holes for the twine on goodie bags
    • Martha Stewart pattern paper
  •   Print and cut the shapes. I used the colors that come with the Imagine.


  • Die cut oval out of kraft cardstock.
  •  Glue oval to a piece of pattern paper.
    • Affix horse to oval with dimensional dots.


  • To make the cake toppers, glue the shapes to the top of the wooden craft stick.
  •  To make goodie bags, cut 4 inches from the top of the bag, and fill bag with candy or a small gift. Make a fold about 2 inches from the top. Place the tag where you want it to be and make 2 marks. Punch the holes were the marks are and through all the thicknes of the fold on the bag. loop the hemp twine through holes and tie.

Saturday, May 21, 2011

Butterfly Card and Experimenting With Vellum in My Cricut Imagine.


How are you all doing ???? I am doing great, and waiting for my soldier to come home by mid June, and my sailor by the end of July. Brandon, my soldier, will be marrying his high school sweetheart when he comes home on vacation, and before leaving to S. Korea. In the meantime, I try to keep busy with ... gosh, so many things !!! LOL One of the things I will be doing is, I volunteered to make Cowboy themed cupcakes or a cake for my grandson's last day of Day Care party. I am sure I will be throwing in something else !!! LOL
Well, to the project. :) I love vellum. Some years ago, I used to make handmade 100% vellum cards, colored them by hand, and pierced the paper to make it look like it was a piece of embroidered fine linen. I got the All Wrapped Up cartridge (great cartridge- love it), and flipping through the pages I saw this gorgeous card, shaped like a butterfly. It had a pair of wings as a layer. Without hesitation, I grabbed my vellum paper to make the wings. Let me tell you, the Imagine prints and cuts vellum beautifully.
  • RECIPE:
  • Print and cut butterfly with regular cardstock
  • Print and cut layers in vellum. Set blade to: speed 2, pressure 3, depth 4. Make sure your mat is sticky enough to hold the vellum uniformly (no bubbles).
    • Set you ink to "DRAFT" quality

  • Spray the wings with Glimmer Mist (I used white)
    • Glue the wings to the vellum butterfly layer.
    • Glue the butterfly layer to the cardstock layer, only at the card "fold"


  • Add crystals and pearls. Embellish paper with paper piercing.

  • Emboss the flowers on the wings. Do this with the embossing stylus on the back of the paper, as shown.
  • Add Stickles ans enjoy the final product


  • Here is the same card, but only the wings are made out of vellum. The only embellishment is Stickles.


Have a nice weekend, everyone !!!! :)