BILINGUAL/BILINGUE Fun sharing paper crafts using Cricut and stamping (scrapbooking, cardmaking), baking and cake decorating, handmade home decor, altered clothing... in a nutshell: anything CRAFT :)********* Diversion haciendo tarjeteria y albumes de recuerdos utilizando la CRICUT y estampando con sellos de goma, recordatorios, hornear y decorar bizcochos (tortas/cakes, articulos para decorar el hogar,adornar ropa ... en fin: todo lo que sea MANUALIDADES :).
Sunday, December 18, 2011
Another stamped Christmas card.
Hello, again !!! Just wanted to share a simple Christmas card. This one is stamped. I used a Unity Stamp Company stamp called Find The Joy.
Just stamp, color and mat the image. Add stickles to the snow flake and red Liquid Pearls to the berries.
Add twill ribbon across the top of the card and add a bow with a glue dot.
Don't forget to go over to my new stamp line site to take a peek: http://adorablesellos.blogspot.com/ . Just click over the link. Merry Christmas !!!!
Friday, December 16, 2011
Tarjeta Paz en la Tierra (Peace on Earth card)
Oh noooooo !!!! Solo quedan 8 días para el día de Navidad y me falta tanto por hacer !!! Aún no he horneado galletitas y mi hija Diana cumple años el día 23 y tengo que hacer su bizcocho (torta, pastel). Aquí les presento una tarjetita fácil de hacer, usando mi nueva línea de sellos transparentes: ADORABLE. En esta tarjeta, usé la colección: SONRISAS.
****Oh noooo !!! Only 8 days left 'til Christmas and I still have so many things to do !!! I haven't baked my cookies yet, and I have to bake a birthday cake for my daughter Diana, who's birthday is the 23rd. I made a quick card using my new stamp line ADORABLE. I used the SMILES collection on this card.
Haga una tarjeta de base 7 x 5. (Make a 7 x 5 card)
- Estampe una imagen en papel blanco y colorée. (Stamp image and color)
- Estampe la frase PAZ EN LA TIERRA. (Stamp sentiment).
- Coloque sobre papel verde y decore con una cinta. (Affix to a piece of green cardstock and decorate with ribbon).
Añada una cinta dorada a la tarjeta 5 x 7 y decore con cristales. (Add a golden ribbon to 5 x 7 card and decorate with crystals).
Pegue la pieza estampada a la tarjeta. (Glue the stamped piece to card).
Sunday, December 11, 2011
"First Christmas Together" clear ornament. (Primera Navidad Juntos)
Most of you know that my son Brandon is stationed in South Korea with the ARMY. Most of you also know that he married his High School sweetheart last summer. Guess what ??? He finally was able to get his wife to S Korea with him, exactly a month ago !!! :) Winters are extremely harsh there, and this is their first year celebrating Christmas away from their families. So, I thought I'd make a Christmas ornament, that will always remind them of their First Christmas Together in their new home, so far away.
I stamped the image on clear cardstock and colored it with Bic Mark It markers. Then, I sprayed a little glue inside the ornament and sprinkled some white glitter inside. I carefully rolled the stamped image to be able to insert it inside the glass ornament. I then added lots of white coarse glitter. After the cap was in place, I decorated the ornament with ribbon and bells. To document the year and place, I punched out circles to use as tags, and wrote down the info.
***** Esta adorno de Navidad, lo hice para mi hijo y su esposa. Están recién casados y les ha tocado irse a vivír a Korea del Sur, mientras mi hijo Brandon cumple con su trabajo en el ARMY. Los inviernos allí son muy crudos y será la primer Navidad que pasen lejos de sus familias. Decidí hacerles un adorno, que les recuerde para siempre, esta primera Navidad juntos y dónde se encontraban.
Estampé la imágen en acetato y la coloreé con Bic Mark It. Eché un poco de pega en "spray" y agregué escarcha blanca. Enrolle el acetato para colocarlo dentro de la bola de cristal. después de colocada la tapa, lo decoré con cintas y cascabeles. Añadí un "tag" con el nombre del lugar y el año.
This last picture says: "Our First Christmas Together" 2011. And yes, the package was full of Christmas goodies !!! As a matter of fact, there were two packages headed to their home in S Korea. LOL And I will be sending a third one this week. Oh well, you know ... Moms :) ....
Reminder: Don't forget to click the link on the tabs to "Shop ADORABLE" to see my new stamp line !!!
Monday, November 21, 2011
Christmas Memories Ornament for Pink Cricut Ornament Exchange
It's beginning to look a lot like Christmas, everywhere I go !!!!! LOL And that is why, at PinkCricut, Sarah is having an Ornament Exchange.
My ornament is a "memory ornament"', because it has a pocket in which you can document the highlights of this Christmas, and even add a family picture. It will all stay safe inside the ornament, and next year, you can put it next to a new Christmas Memory Ornament, and that way create a new family tradition.
So, this is how to do it:
Cut a piece of chipboard that is 6 1/2 x 4 1/2 inches big. Cut 3 pieces of cardstock with the same dimensions. Cut a scalloped border to make a "roof".
From the Christmas cartridge (retired), cut the window shape: 2 on cardstock, and one on clear cardstock (or acetate). Stamp a greeting on the clear cardstock.
Cover both sides of the piece of cardstock with pattern paper. On the third piece of pattern paper, cut out a piece with a circle punch.Add scoring tape (1/8) to the sides and bottom of ornament, and carefully place your piece of pattern paper on it.
Stamp and cut an image, and affix it to the window's ''background'' cardstock. I used Joy To The World stamp set.
Glue a piece of golden ribbon to the top of the ornament. Add the "roof" and decorate with snow and glitter. Add a big bow and a bell.
Make a "faux stitch" with a white gel pen around the ornament. Add embellishments and trimming.
Cut 2 pieces of 6 x 4 inches cardstock. Insert in ornament pocket.
Hang your beautiful ornament from your Christmas tree. Don't forget to make another one next year, and the years to come. That way, you can pick up your ornaments and enjoy the memories of Christmas past. :)
Happy Thanksgiving and Merry Christmas !!!!
Saturday, October 29, 2011
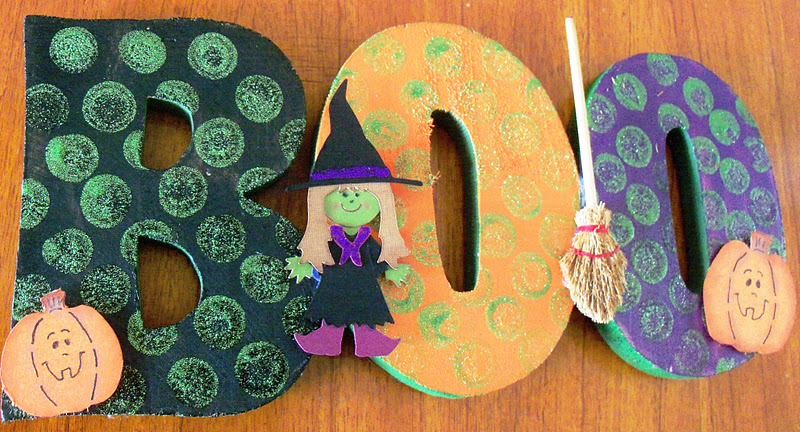
Wood Halloween Wall Hanging
Halloween is day after tomorrow !!!! EEEEKKK Here is a simple project I made with wood letters I got at Walmart. They spell the "word" BOO. All I did was paint them with acrylic paint. Let them dry, and then add dots with a dauber with glitter paint. I then glued the three letters together with a hot glue gun. Final step: decorate with die cuts, either made by you or store bought. And, VOILA, there you have your new Halloween home decor !!!
Have a HaPPy and Safe Halloween on Monday !!!!
Thursday, October 27, 2011
Haunted Village
I promised my daughter, that I would make a haunted village for my grandson Santiago, inspired on one that I saw on Scrapbooks etc magazine. Here it finally is !!!
First, make different size templates for the buildings.
Trace image over cardstock. Cut out windows and doors.
Cover the windows (on the inside) with parchment paper inked in orange.
Cut out silhouettes of bats, ghouls, cats, witches, etc., and place on the inside of the "parchment paper window". Add chalk shading to the walls and draw details into the windows and doors. Glue building together. Add a battery operated tea light to inside of the building.
Paint a block of styrofoam with shades of gray and black. Glue a fence around the styrofoam block and add some cotton to make "fog".
ENJOY YOUR MASTERPIECE !!!!
AT NIGHT !!!! .......... BOOOooooOOOOooooooOOO
I hope you have enjoyed my post, and make this "spooky" little village for your little ones. HUGS !!!! HAPPy HaLLoWeeN !!!!!
Tuesday, July 12, 2011
Clear Plastic Shower Curtain Decorated with Vinyl.
Hello everyone !!! I am taking advantage of a two week window I have between my son Brandon's wedding and my other son coming home for vacation from the NAVY !!! So, what did I do, I CRAFTED !!!! LOL
I took a plain clear plastic shower liner and decorated it with a summer theme. I did this with cuts of waterproof vinyl I made with my Cricut Imagine. I also decorated a toothbrush holder with the same kind of vinyl.
- Recipe:
- cartridges:
- clear vinyl shower liner
- white shower liner (to put in the back of the clear liner) *OPTIONAL
- white toothbrush holder
- Print and cut shapes with your Cricut Imagine.
- set your machine's pressure to 3; blade depth to 4.
- Adhere to shower curtain and toothbrush holder.
THANKS for stopping by !!! Stay cool in this very hot summer :)
Subscribe to:
Posts (Atom)