Showing posts with label Don Juan cartridge. Show all posts

Wednesday, February 15, 2012

Sweet Monsters Valentine's Day cards and treats / Tarjetitas de San Valentín con tema de Dulces Monstruos


Hello everyone !!! ... And yes, I know Valentine's Day was yesterday :) Still, the design and techniques used to make this cards and goodie bags, can be used on any occasion cards.
I designed the card so that it could be attractive and fun for any 3 to 4 year old. That is why I didn't cover the cute little monster with an envelope. As soon as they got this card in their hands, they wanted to open it and see the rest of the creature with the big googly eyes.
I designed the card on my Gypsy .

*¡Hola! Aunque el Día de San Valentín fué ayer, quise mostrarles este proyecto porque las técnicas y el diseño usados sirven para tarjetas de cualquier ocasión. Las diseñé para que fueran atractivas para niñitos de 3 a 4 años. Por eso, no quise cubrirlas con un sobre y desperté su curiosidad de querer descubrír, como era esa criatura con esos ojos tan grandes. Usé mi máquina Gypsy para diseñarla.
RECIPE:

Cut base card and stamp image: *corte la tarjeta base y estampe el diseño:

Turn card over and stamp sentiment: *vire la tarjeta y estampe la frase:

Cut the slit that will hold the "front" of the card: *Corte la pestaña que sujetará el frente de la tarjeta:

Color stamped image and add googly eyes: *coloree la imagen y añada los ojos plásticos:


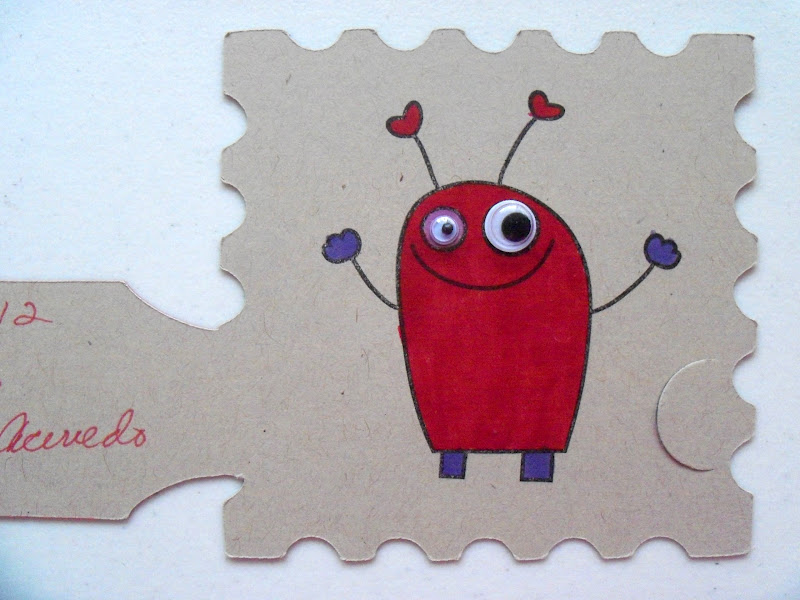


These are the cards with the "tube" treat bags for my grandson's Day Care. The "puzzle" shaped toppers were made with the Don Juan Cricut cartridge. * Estas son las tarjetas terminadas con las bolsitas de dulces. La forma de rompecabezas fue hecha con el cartucho de Cricut: Don Juan.

Saturday, March 19, 2011

"HomE Is WhERe ThE HeArT iS" ... a very crafty home...and heart !!!


HI ! And welcome to KinderStampO's "Home is Where the Heart is" Blog Hop sponsored by Unity Stamp Co. If you have arrived here from  Angie at http://angiesscrappinspot.blogspot.com/
then you are in the right place. If you just stopped by to say hi but decided to join the hop, then start from the beginning by clicking here.

Now, with no further ado, I present to you my project !!!!

I made a wreath with the word CASA (which means HOME in english). Being as crafty as I am, I made a wreath in which the word "CASA" is covered with miniature items of what you will commonly see when entering my home. Those would be (but not limited to): paper crafting materials, cooking and baking (and eating) utensils, sewing and, cleaning items(which are the less used LOL).
  • Here are some of the items I incorporated to my wreath.
    • The flatware, plate and cupcake are cuts from: From My Kitchen cartridge.
    • The two hearts are cuts from: Don Juan cartridge.
    • The hearts were cut on chipboard and covered with fabric.

  • The wooden spools were covered with embroidery floss.
  • The plate,silverware and cupcake were painted with acrylic paint.
  • I filled the basket with tiny cuts of cardstock.
  • I made a bouquet of tiny flowers that were inserted in styrofoam (already in the flower pot).


  • The wood letters: C-A-S-A were painted in blue.
  • A piece of balsa wood was covered with burlap.
    • The letters were glued to the finished burlap piece.  
  •  Embellish letters and wreath as you wish. I used a hot glue gun to add the embellishments. 


      I hope that you have enjoyed my project  and felt inspired. It is time to hop on to the next blog and see what she has made. You will now be stoppping by Christi at - http://alteredambitions.blogspot.com/
  • And now, to the BLOG CANDY !!! Yuuummmm
Unity Stamp Co. 'In Store Exclusive' Throughout all Generations

Unity Stamp Co. 'In Store Exclusive'Roots and WIngs
Ippity by Unity Life's Little Moments
Unity Stamp Co. and Bella Blvd. Family Dynamix
  • How do I win ?????
    • Leave a comment on each of the blogs and let them know what you love about Unity and/ or their featured project.
    • Become a follower of the designers if you aren't already.
    • Become a Facebook follower of Unity Stamp Co. on Facebook http://www.facebook.com/pages/Unity-Stamp-Company/103252399709382 and thank them for sponsoring the hop.


Saturday, November 13, 2010

A ThAnKInG WE WiLL Go blog hop: "Lets be Thankful" ("Demos Gracias")


So the day is finally here and I really hope you are enjoying this blog hop as much as I am. You must be coming from Madison's blog at http://www.funkycards.blogspot.com/.  Thank you Jess for being such a wonderful hostess and BTW, if any of you need to go back to the beginning of the hop, click here.

There are so many things I have to be grateful for but,  the thing that I am most grateful for are my children. They have been a true blessing since the day I found out I was pregnant for the first time. Now they are young adults and guess what ??? ... LOL... they keep me young, happy and soooooooo active!!! .... more than I wish to. My children are the heart of my house, in which there is always laughter and activity 24/7. The best thing is that children are God's gift that keeps on giving; now I not only have 5 children but, I also have my precious grandson. It is for this reason, that a picture of my children, grandson and, my four legged son is the focal point of my special Thanksgiving project.

Lets do it:

  • Cut a house shape from chipboard. Cut a window in the front part of the house that is a little bit smaller than the size of the picture.


  • Remove the red cover of the tape to expose the sticky part. Place a piece of acetate over the picture.Cut around picture, removing excess acetate.


  • On the back part of the "window" glue a piece of ribbon or trimming to form a "curtain". Go around the window frame (back part of the "house" with Terrifically Tacky Tape and remove the red plastic.
    •  Place window over picture, making sure picture is centered. Cover chipboard with cardstock.
    • **Glue front of house to the back of the house.


Make scarecrows out of chipboard and cover with cardstock. Glue raffia to dolls head, arms and  legs. Dress up.


Make window frame, scallop border and fence out of cardstock covered chipboard.


  • Cut pumpkins and leaves. Color and ink.


  • Add fence, scarecrows, leaves and pumpkins using dimensional dots and tap


Make the circles for the banner and glue to the twine with glue dots. Glue the ends of the banner twine to the house. Glue the scallop border to the house, catching in the ends of the banner.
    • The banner is written in Spanish. In English it means: "LET'S BE THANKFUL".


It's now time to hop over to Meighen's blog at http://scrappin3rdeeschik.blogspot.com and see what wonderful project she has made to express how she is thankful.
May God bless you all and have a beautiful Thanksgiving Day.
If you do happen to get lost on this hop, here is a list of all the participating blogs. :)
Jessica - http://www.kinderstampo.com/

Cheryl - http://cheryl-gibson.blogspot.com/
Debbie - http://craftydeb-ddscrafts.blogspot.com/ 
Iva - http://ivarai.com/
Jessica Baker - http://thatzuneek.blogspot.com/
Kimberlee - http://kimme-thelifeofaprincess.blogspot.com/
Linda - http://www.krazyquilling.com/
Liz - http://lizspaperloft.blogspot.com/
Madison - http://www.funkycards.blogspot.com/
Martha - http://dreamofcrafting.blogspot.com/ Hey, that's ME !!!
Meighen - http://scrappin3rdeeschik.blogspot.com/
Nicki - http://canadiannickelscrapn.blogspot.com/
Shelley - http://heartstring-designs.blogspot.com/
Sigrid - http://lovescrapreflect.blogspot.com/
Vickie - http://twochicksonalimb.blogspot.com/
Jess - http://www.kinderstampo.com/p/thanking-we-will-go-blog-hop_12.html