Showing posts with label Imagine More cartridge. Show all posts

Saturday, June 4, 2011

Fathers Day Gift: End of the Day Personal Items Holder.


Hello everyone and happy Saturday !!! The project I made for today is very, very practical and, it can be used for teenagers, young adults and dads, alike. It is a tray where guys can put in their cel phone, keys, loose change, glasses, wallet, etc. At my house, I have to pick up those items from the dinning table, every day. This one I made for my son (who is not a dad.. not even married LOL). I designed it having in mind his major interest in life: music and his guitar. I used printable vinyl to decorate the tray.
  • RECIPE:
    • cartridges:
    • Cricut Printable vinyl
    • candle tray (from Walmart)
    • twine
    • glue gun
  • Cut and print a square with the stave pattern on printable vinyl. Let it dry a few minutes and remove only the vinyl, leaving the backing on the mat.


  • Adhere the printed vinyl to the tray.


  • Cut and print the guitar. Layer it.

  • Affix the guitar to the label. Glue twine to the tray with a glue gun.


Thanks for stopping by and have fun creating your personalized gifts for Fathers Day !!!!

Saturday, April 16, 2011

Easter Treat Bag Made With Lunch Brown Bags and Cricut Imagine.


Oh yes !!!! In only 8 more days it will be Easter !!! I am so excited because, we are introducing my grandson to our family traditions and we are having a ball. He is in Day Care and they will be having an Easter Egg Hunt !!! ... his first ever, and I have to be there to see him and take pictures. Then, next Sunday, he will be getting his Easter candy and dyed eggs. He will be dressed like a little prince for church.

So, with Easter coming so soon, I decided to make some Easter treat bags, using my Imagine and some lunch brown bags. They are so cute !!!
  • RECIPE:
  • Cut and print the scallop oval. Fold it in half.


  • Fold the bag in half.
  • Cut 1 1/2 inch from fold line.
  • Pierce 2 small holes on the bag's fold. Thread a pice of hemp cord app. 9 inches long. Make a knot on each end.
  • Cut and print a rabbit/bunny. Decorate and glue to a green scalloped circle.
  • Add the bunny piece to the scalloped oval. Make a bow and add on top of bunny piece.

  • Make a slit on the scalloped oval fold, long enough to go from one end of the hemp handle to the other. Insert the hemp handle through the stlit.
  • Make grass by cutting a strip of cardstock and cutting it with fringe scissors.

HAVE A WONDERFUL EASTER SUNDAY !!!!

Thursday, February 3, 2011

Altered Binder for Baby Santiago's Day Care - Imagine Blast Off cartridge


Hi again!!! A few days ago, my daughter asked me if I could decorate a binder for my grandson Santiago's new Day Care. I was in a hurry, so I picked up some white cardstock and went to work with my Cricut Imagine. I used Blast Off Imagine cartridge for most all of the project, except for the balloons, cat and dog, that were cut from Imagine More Imagine cartridge. I had lots of fun making this project. :)

This is a view of the back of the binder:


Saturday, November 20, 2010

Decorations for your Thanksgiving table using your Cricut Imagine / Decoraciones para Accion de Gracias con la Cricut Imagine


Hello everyone !!! I am Martha and can't be happier to be a Weekend Warrior on Tammy's Design Team.And yes, it will be Thanksgiving in just a few days!!! And among the many things that I have to be thankful for, I am that I have my Cricut Imagine that helps me speed up my Holiday decorations. You can go to my blog and check out other creations /i have made with this wonderful machine. For this project, I made some things for the Thanksgiving table: a table runner, placemats, menu cards and place cards. I used burlap on all of the items.
****Para este proyecto prepare un "runner", mantelitos, tarjeta de menu y tarjeta de asiento, todas con tela de saco.
Preparing burlap:
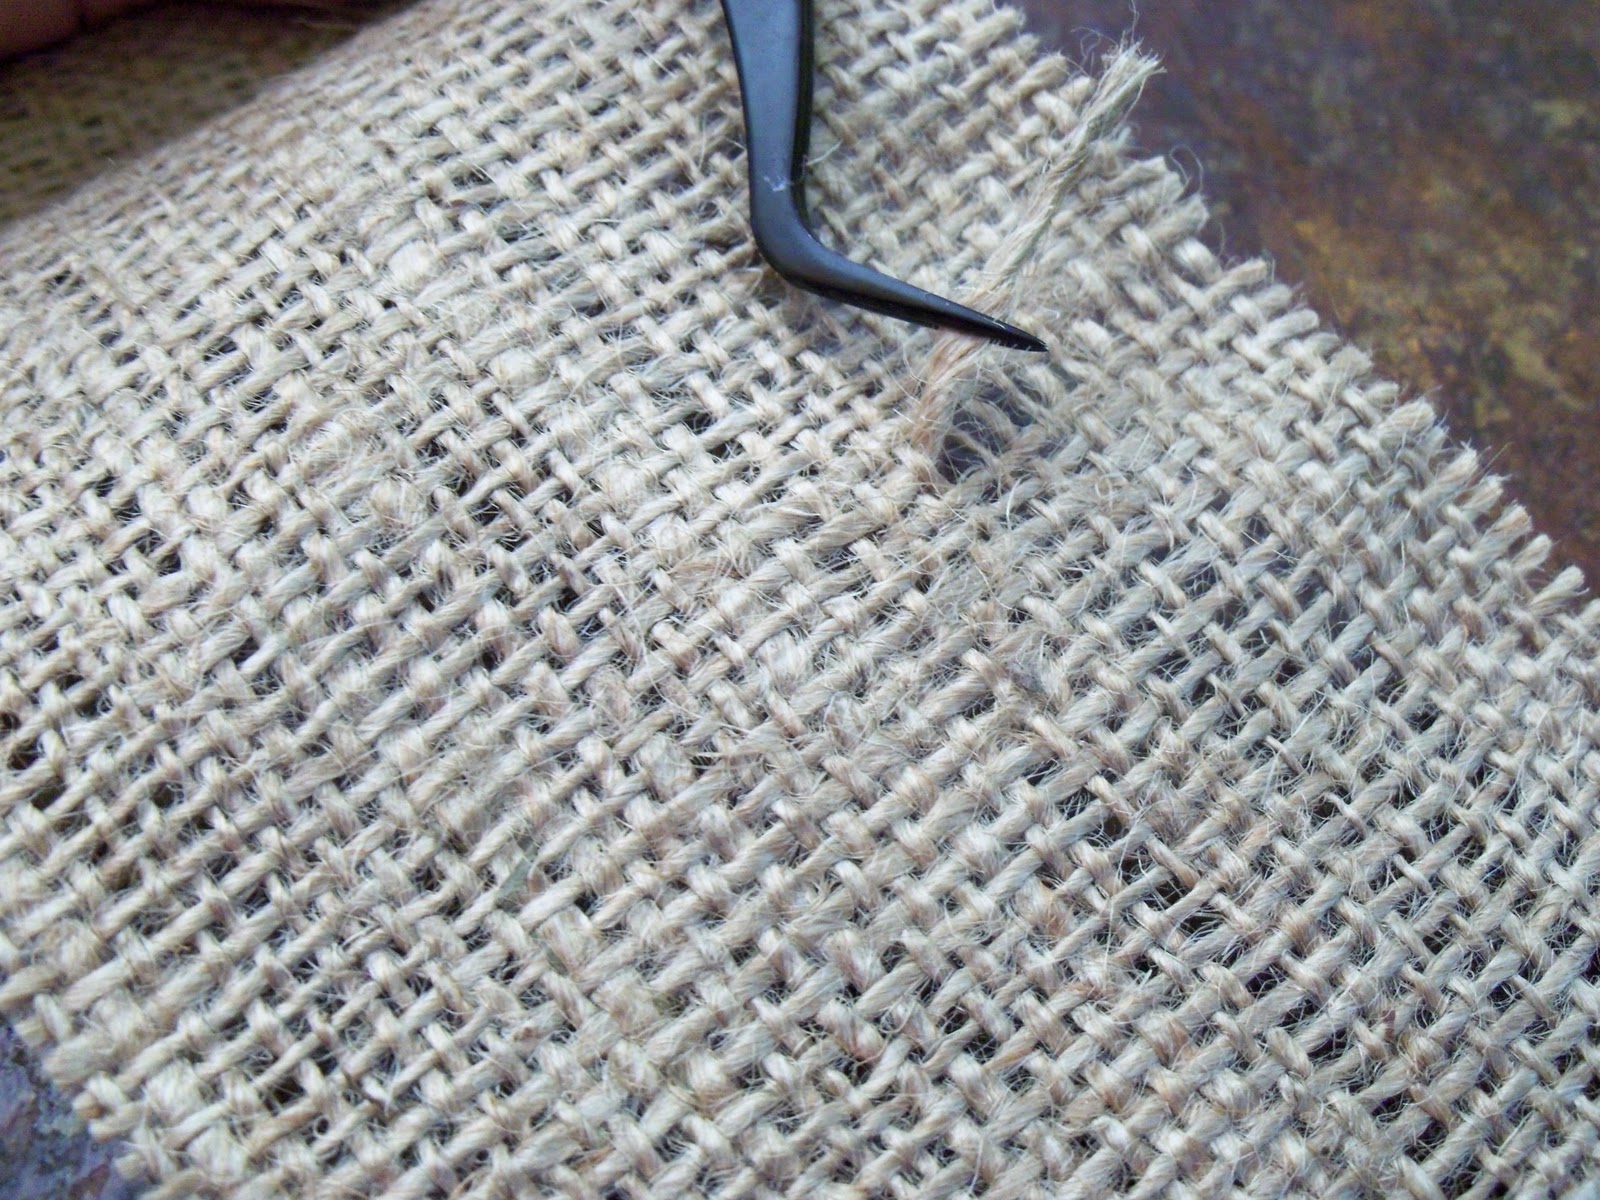
Gently handwash, let dry and iron the burlap that will be decorated with fabric transfer - Decide how big you want your pieces to be and do the following: pull out a thread of the burlab - Cut through the space the thread was - Pull out more threads on each side to make a fringe.
****Lave a mano, seque y planche la tela de saco que lleva adornos con "iron-on transfers". Luego, preapare la tela siguiendo estos pasos.


Menu cards:
You want the burlap to be stiff. For this you can use a fabric stiffener or hard drying glue. I used glue this way: add all around the edges, brushing towards the center. Add a little more glue to the center and spread. Let dry.
****Si desea endurecer la tela, use un endurezador o use pega que seque duro. Aplique en toda la orilla y con una brocha, hake la pega hacia el centro. A~nada mas pega si es necesario y deje secar.

This menu card is 5 x 7. I cut a piece of cardstock 4 1/2 x 6 1/2 and layered it on top of the burlap. Then, using my Imagine, I cut maple leaves out of green cardstock from The Create a Critter cartridge. to place them on the top layer of the menu card where the actual menu is written. Make a bow to decorate the place card holder.
****Prepare en su computadora la tarjeta con el menu y decore con hojas cortads con su maquina.


Place cards:
Fold a piece of 6 x 3 inch of cardstock by half - Glue a piece of fringed burlap to the front - With the Imagine More and Create a Critter cartridges installed to your Cricut Imagine, cut a maple leaf 3 inches high and flood with color - Glue the leaf to the burlap - Make a name tag and add to the place card.
****Doble por la mitad un pedazo de cartulina de 6 x 3 pulg. Adorne con tela. Coloque una hoja previamente cortada y coloreada en la Cricut Imagine, con los cartuchos mencionados. Ponche una etiqueta con el nombre.


Runner and place mats:
With the Imagine More and Create a Critter cartridges installed into your Cricut Imagine, select maple leaves, acorns and pumpkin shapes and flood with the pattern of your choice. Place Print'n Press Iron-On transfers on your cutting mat. Set your machine at pressure 5 and multicut 2. Print and cut and iron on to your runner and place mats (previously finged and ironed).
****Ponga en su "mat" un papel Print'n Press para hacer transferencias. En su maquina, ponga la navaja en presion 5 y "multicut" 2. Corte las figuras y planchelas a la tela, previamente deshilada y planchada.


Place burlap on a flat, long surface. Add a thin strip of Liquid Stitch glue to the the thread where the fringe starts. Gently lay down the trimming over the glue, gently tapping (do not press down). Go all around the runner or place mat.
****Sobre su tela ya  preparada, pegue el adorno sobre una hilera de pega Liquid Stitch. No presione el adorno, dejelo caer suavemente sobre la pega.


You will be surprised at your results !!! Isn't this lovely ???


HAPPY THANKSGIVING !!!!!
FELIZ DIA DE ACCION DE GRACIAS !!!

Saturday, October 2, 2010

Imagine Nation blog hop: Design your own T-shirts !!! / Dise~na tus propias "T-shirts" !!!


So happy you arrived safely from Meriah's blog at http://twoscraptasticgals.blogspot.com/ !!! I am sooooo excited with this blog hop, mainly because my Cricut IMAGINE is my new love and I want to share that with all of you !!! Previously on my blog, I posted two projects I had made with my IMAGINE using white cardstock: I made a wall hanging and a card. This machine is so wonderful, that this time I printed and cut iron-on-transfer paper, to make beautiful T-shirts for my grandson. The results were amazing !!! And best of all, I did a whole pack of 5 white T-shirts in about an hour, and that is including ALL the ironing time. I could have gone on and on !!!  LOL Now what I need are more IMAGINE cartridges to have a wider variety of themes to work with. And now, without further ado, I present to you: MY PROJECT !!!

***** Estoy muy feliz de compartir con ustedes mi gran entusiasmo con la nueva maquina Cricut IMAGINE. Anteriormente en mi blog, puse dos proyectos que cree usando cartulina blanca: un adorno de pared y una tarjeta. Esta maquina es tan maravillosa que esta vez el papel que imprimi y corte fue "iron-on-transfer" para hacer dise~nos en camisetas para mi peque~no nieto. Los resultados fueron espectaculares !!! Lo mejor de todo, fue que logre hacer 5 camisetas en menos de una hora! Ahora, sin mas preambulos, les presento: MI PROYECTO !!!****

What you need:
***Necesitas:
  • White cotton T-shirts (**Camisetas blancas de algodon)
  • Iron on transfer paper for inkjet printers. I used Print'n Press that I got at Walmart. (Papel de transferencia para impresoras inkjet)
Let's do it! :
***Hagamoslo!:
  • Wash, dry and iron the T-shirts .Do NOT use fabric softener.(**Lave, seque y planche la camiseta. No use suavizador)
  • Set your IMAGINE machine: (**Ajuste su maquina IMAGINE)
    • pressure: 3 (**presion)
    • depth: 4 (**profundidad)
    • speed: 3 (**velocidad)
    • select the "combine" button on the top-left part of your screen (**seleccione el boton "combine")

  • IMPORTANT: Select the "FLIP HORZ" button if you are using words on your transfer. You can select this button on the "mat" screen, also. Not doing this will cause that the written messages come out backwards when you iron it to the T-shirt. (***Seleccione el boton "FLIP HORZ" para invertir las letras. De esta manera, cunado planche la imagen, las letras le quedaran al derecho)


  • This is how the cut and printed image looks like on the mat.


Now, let's put our T-shirt together:

  • Iron the image onto the T-shirt (**Planche la imagen a la camiseta)

  • carefully remove the paper backing when it is cold (** Remueva el papel blanco cuando este frio y disfrute su creacion!!!)

  • enjoy your new creation !!!!!!

Other designs I made:


NOTE: The pumpkin is one of the images that comes "built in" the machine. It is only a silhouette of a pumpkin. I used paint markers to embellish it and to make the face. (*** La calabaza es solo una silhueta. La pinte con marcadores de pintura para hacer la carita)

It was so nice having you stop by and I really hope you come back again some other time :)

CaNdy*CanDy*cAnDY: Leave a comment at the end of this post for a chance to win a $15 gift card from Oh My Crafts. The winner will be chosen using random.org on Monday afternoon. (***Deje un comentario para la oportunidad de ganar un certificado de $15 de Oh My Crafts.

There will be a grand prize: GYPSY, donated by Provocraft and 6 Imagine cartridges, also donated by Provocraft. The winners of the prizes donated by Provocraft will be chosen from comments posted on ALL of the BLOGS !!! 
Now hurry and hop on to Kimmy's blog at  http://scrappinwithkimmy.blogspot.com/ and see what surprise project is waiting for you !!!

If you ever get lost on this blog hop, here is a map to help you find your way back. :)

Emma at http://www.creativetimeforme.com/
Paula at http://www.morethanfavors.blogspot.com/
Meriah at http://twoscraptasticgals.blogspot.com/
Martha at http://dreamofcrafting.blogspot.com/
Kimmy at http://scrappinwithkimmy.blogspot.com/
Margie at http://www.bellabugcreations.blogspot.com/
Debbie at http://scrapbydebbie.blogspot.com/
Lori at http://got2bcrafting.blogspot.com/
Bobbi Jo at http://sweetsassydiva-gspot.blogspot.com/
Jess at http://scrappyjess.blogspot.com/