Showing posts with label Nursery Tails cartridge. Show all posts

Saturday, April 30, 2011

Mother's Day card for my Daughter Cindy.


 In just eight days it will be Mother's Day. It will be my oldest daughter, Cynthia, third Mother's Day !!! She is so awesome !!! She not only is a mommy (to my only grandson) and a wife, but she is about to start her last year as a Resident of Pediatrics. She drives everyday an hour and a half each way to the hospital. She has to stay every four days overnight in the hospital to work. She has passed all her USMLE tests and is thinking on specializing even more, once she finishes General Pediatrics.
My project today is the Mother's Day card I made for my daughter Cindy.
  • RECIPE:
    • cartridges: 
    • Spellbinders Embossing Dies Ribbon Tag
    • Prima Flowers
    • Stickles
    • Stamp Set: Mom You Rock (by My Creative Time) for sentiment
    • Martha Stewart border punch: for the fence
    • Doodlebug Design Crushed Velvet flock: for flower center
  • Print and cut the background image 2 or 3 times, to allow for enough pieces for layering.
    • Cut the mother and child silhouette.
    • Make the fence with the border punch
  •  Put the "mat"together.
  • Layer the background and add stickles
  • Put the silhouette on the card. Affix with glue dots
  • Ink fence and affix to card with glue dots
  • Stamp sentiment on white cardstock and run through Big Shot with die. Loop a ribbon through openings.
  •  Add card front to "mat". Affix card front/mat to a white card base.
  •  Flower has 2 layers of petals. The blue flower center was made with crushed velvet flock.
  •  Sentiment on ribbon tag

Hope you liked the card !!! And I really, really hope my daughter loves it !!!

Saturday, April 16, 2011

Easter Treat Bag Made With Lunch Brown Bags and Cricut Imagine.


Oh yes !!!! In only 8 more days it will be Easter !!! I am so excited because, we are introducing my grandson to our family traditions and we are having a ball. He is in Day Care and they will be having an Easter Egg Hunt !!! ... his first ever, and I have to be there to see him and take pictures. Then, next Sunday, he will be getting his Easter candy and dyed eggs. He will be dressed like a little prince for church.

So, with Easter coming so soon, I decided to make some Easter treat bags, using my Imagine and some lunch brown bags. They are so cute !!!
  • RECIPE:
  • Cut and print the scallop oval. Fold it in half.


  • Fold the bag in half.
  • Cut 1 1/2 inch from fold line.
  • Pierce 2 small holes on the bag's fold. Thread a pice of hemp cord app. 9 inches long. Make a knot on each end.
  • Cut and print a rabbit/bunny. Decorate and glue to a green scalloped circle.
  • Add the bunny piece to the scalloped oval. Make a bow and add on top of bunny piece.

  • Make a slit on the scalloped oval fold, long enough to go from one end of the hemp handle to the other. Insert the hemp handle through the stlit.
  • Make grass by cutting a strip of cardstock and cutting it with fringe scissors.

HAVE A WONDERFUL EASTER SUNDAY !!!!

Saturday, March 5, 2011

Easter Gift Bag... Oh so Cute !!!


Hi there !!!! First of all, I want to thank Tammy and Angela for giving me the oportunity to show them around when their cruise stopped at San Juan, Puerto Rico's port. We had so much fun. Wish we have had more time :(
From today on, for three months, I will have the pleasure and the honor of posting a Cricut Imagine project on this blog every Saturday. Today, I will start with an Easter project... yes, because I know that everyone is so ready for spring. I made the cutest Easter gift bag. :)

Recipe:

Imagine cartridges: Blossom (yellow background); Nursery Tails (lamb, bird on branch)
Cricut cartridge: Easter (fonts)
Embossing folder: Cuttlebug Divine Swirls
White cardstock: American Crafts
Stickles
Liquid Applique by Marvy Uchida to create the "wool" on lamb.
  • Flood fill to create pattern paper for background:


  • Cut out shapes and decorate; emboss background, and put together:


  • Cut background to fix the front of the bag - Decorate corners with a punch - Affix to bag - Glue "Happy     Easter" to background.


Saturday, October 2, 2010

Imagine Nation blog hop: Design your own T-shirts !!! / Dise~na tus propias "T-shirts" !!!


So happy you arrived safely from Meriah's blog at http://twoscraptasticgals.blogspot.com/ !!! I am sooooo excited with this blog hop, mainly because my Cricut IMAGINE is my new love and I want to share that with all of you !!! Previously on my blog, I posted two projects I had made with my IMAGINE using white cardstock: I made a wall hanging and a card. This machine is so wonderful, that this time I printed and cut iron-on-transfer paper, to make beautiful T-shirts for my grandson. The results were amazing !!! And best of all, I did a whole pack of 5 white T-shirts in about an hour, and that is including ALL the ironing time. I could have gone on and on !!!  LOL Now what I need are more IMAGINE cartridges to have a wider variety of themes to work with. And now, without further ado, I present to you: MY PROJECT !!!

***** Estoy muy feliz de compartir con ustedes mi gran entusiasmo con la nueva maquina Cricut IMAGINE. Anteriormente en mi blog, puse dos proyectos que cree usando cartulina blanca: un adorno de pared y una tarjeta. Esta maquina es tan maravillosa que esta vez el papel que imprimi y corte fue "iron-on-transfer" para hacer dise~nos en camisetas para mi peque~no nieto. Los resultados fueron espectaculares !!! Lo mejor de todo, fue que logre hacer 5 camisetas en menos de una hora! Ahora, sin mas preambulos, les presento: MI PROYECTO !!!****

What you need:
***Necesitas:
  • White cotton T-shirts (**Camisetas blancas de algodon)
  • Iron on transfer paper for inkjet printers. I used Print'n Press that I got at Walmart. (Papel de transferencia para impresoras inkjet)
Let's do it! :
***Hagamoslo!:
  • Wash, dry and iron the T-shirts .Do NOT use fabric softener.(**Lave, seque y planche la camiseta. No use suavizador)
  • Set your IMAGINE machine: (**Ajuste su maquina IMAGINE)
    • pressure: 3 (**presion)
    • depth: 4 (**profundidad)
    • speed: 3 (**velocidad)
    • select the "combine" button on the top-left part of your screen (**seleccione el boton "combine")

  • IMPORTANT: Select the "FLIP HORZ" button if you are using words on your transfer. You can select this button on the "mat" screen, also. Not doing this will cause that the written messages come out backwards when you iron it to the T-shirt. (***Seleccione el boton "FLIP HORZ" para invertir las letras. De esta manera, cunado planche la imagen, las letras le quedaran al derecho)


  • This is how the cut and printed image looks like on the mat.


Now, let's put our T-shirt together:

  • Iron the image onto the T-shirt (**Planche la imagen a la camiseta)

  • carefully remove the paper backing when it is cold (** Remueva el papel blanco cuando este frio y disfrute su creacion!!!)

  • enjoy your new creation !!!!!!

Other designs I made:


NOTE: The pumpkin is one of the images that comes "built in" the machine. It is only a silhouette of a pumpkin. I used paint markers to embellish it and to make the face. (*** La calabaza es solo una silhueta. La pinte con marcadores de pintura para hacer la carita)

It was so nice having you stop by and I really hope you come back again some other time :)

CaNdy*CanDy*cAnDY: Leave a comment at the end of this post for a chance to win a $15 gift card from Oh My Crafts. The winner will be chosen using random.org on Monday afternoon. (***Deje un comentario para la oportunidad de ganar un certificado de $15 de Oh My Crafts.

There will be a grand prize: GYPSY, donated by Provocraft and 6 Imagine cartridges, also donated by Provocraft. The winners of the prizes donated by Provocraft will be chosen from comments posted on ALL of the BLOGS !!! 
Now hurry and hop on to Kimmy's blog at  http://scrappinwithkimmy.blogspot.com/ and see what surprise project is waiting for you !!!

If you ever get lost on this blog hop, here is a map to help you find your way back. :)

Emma at http://www.creativetimeforme.com/
Paula at http://www.morethanfavors.blogspot.com/
Meriah at http://twoscraptasticgals.blogspot.com/
Martha at http://dreamofcrafting.blogspot.com/
Kimmy at http://scrappinwithkimmy.blogspot.com/
Margie at http://www.bellabugcreations.blogspot.com/
Debbie at http://scrapbydebbie.blogspot.com/
Lori at http://got2bcrafting.blogspot.com/
Bobbi Jo at http://sweetsassydiva-gspot.blogspot.com/
Jess at http://scrappyjess.blogspot.com/

Wednesday, September 29, 2010

Cricut Imagine: The Second Project- It's a Girl! card / El Segundo Proyecto: tarjeta- Es Una Ni~na !


I love my Cricut Imagine ! Here is the cutest baby girl card I made !!! It took more time to decorate and emboss the card, than what it took me to actually design and cut the images for it. So, in just a few simple steps, this beautiful card was created.
**** Adoro mi Cricut Imagine !
  • cartridge used was: (** El cartucho usado fue:)  Nursery Tails art cartridge
  • Images were cut at: (** Las imagenes se cortaron a:)  4.5 inches
  • The brown round scallop "shadow" was cut at 4.7 inches (** El circulo marron festoneado se corto a 4.7 pulgadas)
  • Dimesional foam dots were used to create the layering effect (** Para crear efecto de relive en las capas se usaron almohadillas dimensionales)

  • Stickles were used for the bird and lamb's eyes (**usado para los ojos)
  • Gelly Roll Clear Star (Sakura) pen was used to highlight the word "GIRL"
  • Cuttlebug embossing folders were used to emboss card;Swiss Dots and Divine Swirls. (**Se usaron para crear el relive en la tarjeta)

Wednesday, September 22, 2010

Cricut Imagine: The First Project / Cricut Imagine: El primer Proyecto


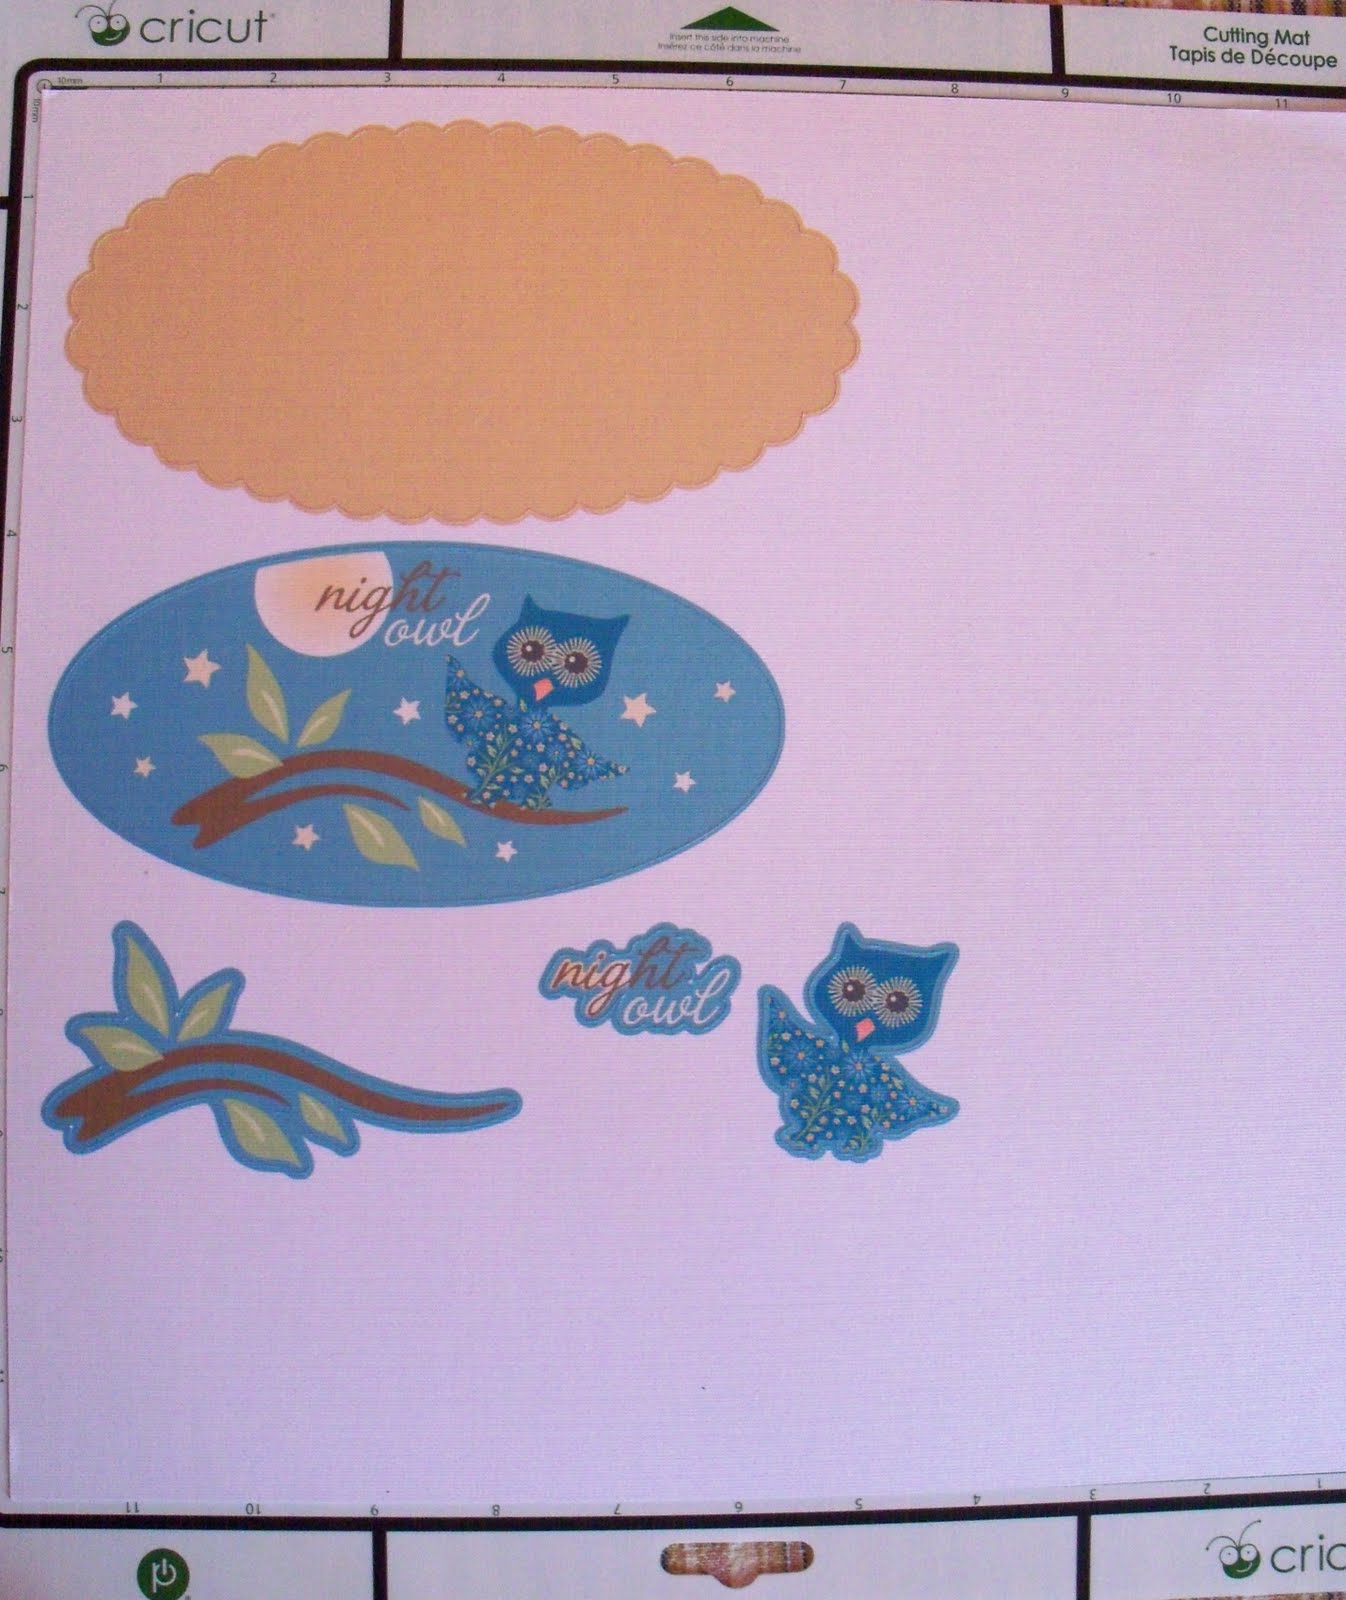
Hello everyone !!! I am thrilled to have the Cricut Imagine !!! When the machine printed and cut the images and layers (all at the same time) that I needed to create my first project... I just couldn't believe my eyes !!! OMG ... the excitement... !!! LOL And in just a matter of a couple of minutes, I was pulling out the finished cuts out of my mat, all ready to be layered, blinged and glued to a card, LO or, like I choose, a wood plaque.
I made this "Night Owl" wood wall hanging, for my daughter Diana, who really is a night owl. She goes to bed after 2:00am every day, either studying or partying. I hope she likes it (she better... LOL). Cricut Imagine, my new love !!! :)

What did I use to make my project??? Here is the list of materials:
  • Cricut Imagine cartridge: Nursery Tails
  • 12 x 12 white cardstock
  • 2 Swarovski crystals for the owl's eyes
  • Ranger Stickles (Stardust) for stars
  • Stampin Up ink pad (color:Suede) for inking borders
  • oval wood plaque
  • brown Apple Barrel by PLaid paint.
These are the cuts:

Here are more views:
Note: the brown background is paint.