Saturday, May 28, 2011

Father's Day "Wild West" Cupcake Toppers and Goodie Bags.


I just can't believe how fast this year is going !!!! OMG !!! Father's Day already ????? Well.... you better believe it, in only three more weeks, it will be here! To make it easier on you, I am bringing you some some inspiration for your Father's Day projects.
I made some Cowboy themed cake toppers and goodie bags. These can be used for other occasions like BBQ's, boys birthdays, and school parties. I took these goodies to a party at my grandson's Day Care, so you can see how versatile this theme is. Here is my little cowboy:


  •  RECIPE:
    • cartridges: Old West: I used this cartridge to cut tha cake toppers and the goodie bag horses.
    • Spellbinders Nestabilities: Classic Oval Large
    • hemp twine
    • brown lunch bags
    • wooden craft sticks
    • white gel pen (to fill in the details in cut outs)
    • Crop A Dile: to make the holes for the twine on goodie bags
    • Martha Stewart pattern paper
  •   Print and cut the shapes. I used the colors that come with the Imagine.


  • Die cut oval out of kraft cardstock.
  •  Glue oval to a piece of pattern paper.
    • Affix horse to oval with dimensional dots.


  • To make the cake toppers, glue the shapes to the top of the wooden craft stick.
  •  To make goodie bags, cut 4 inches from the top of the bag, and fill bag with candy or a small gift. Make a fold about 2 inches from the top. Place the tag where you want it to be and make 2 marks. Punch the holes were the marks are and through all the thicknes of the fold on the bag. loop the hemp twine through holes and tie.

Saturday, May 21, 2011

Butterfly Card and Experimenting With Vellum in My Cricut Imagine.


How are you all doing ???? I am doing great, and waiting for my soldier to come home by mid June, and my sailor by the end of July. Brandon, my soldier, will be marrying his high school sweetheart when he comes home on vacation, and before leaving to S. Korea. In the meantime, I try to keep busy with ... gosh, so many things !!! LOL One of the things I will be doing is, I volunteered to make Cowboy themed cupcakes or a cake for my grandson's last day of Day Care party. I am sure I will be throwing in something else !!! LOL
Well, to the project. :) I love vellum. Some years ago, I used to make handmade 100% vellum cards, colored them by hand, and pierced the paper to make it look like it was a piece of embroidered fine linen. I got the All Wrapped Up cartridge (great cartridge- love it), and flipping through the pages I saw this gorgeous card, shaped like a butterfly. It had a pair of wings as a layer. Without hesitation, I grabbed my vellum paper to make the wings. Let me tell you, the Imagine prints and cuts vellum beautifully.
  • RECIPE:
  • Print and cut butterfly with regular cardstock
  • Print and cut layers in vellum. Set blade to: speed 2, pressure 3, depth 4. Make sure your mat is sticky enough to hold the vellum uniformly (no bubbles).
    • Set you ink to "DRAFT" quality

  • Spray the wings with Glimmer Mist (I used white)
    • Glue the wings to the vellum butterfly layer.
    • Glue the butterfly layer to the cardstock layer, only at the card "fold"


  • Add crystals and pearls. Embellish paper with paper piercing.

  • Emboss the flowers on the wings. Do this with the embossing stylus on the back of the paper, as shown.
  • Add Stickles ans enjoy the final product


  • Here is the same card, but only the wings are made out of vellum. The only embellishment is Stickles.


Have a nice weekend, everyone !!!! :)

Saturday, May 14, 2011

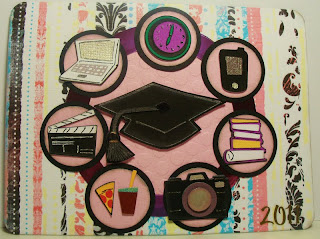
"My Life as a Student" - Graduation card.


Yaaayyyyy !!!! Another graduation in the family !!! This time, it's my youngest daughter Diana, who finishes her Bachelor's Degree in Advertising and Film Production (actually, she is graduating with two degrees). She still does not know what she wants to do next, but she has already been admitted to Graduate School. Have you any idea how many graduations I have attended, being the mom of 5 children ??? LOL And yes, they all have gone to college to get their degrees. I still have a few more graduations to attend, believe it or not !!!

With this card (that is today's project), I tried to highlight some of the items that my daughter used the most while attending her four and a half years at the university; those are: the clock or watch, to always be on time; her white "Mac" computer; the clapperboard for her production of short films; fast food; oh, HER CAMERA!; books and, her constant companion, her "cel".
    • Cuttlebug embossing folder: Seeing Spots
    • Crystal Effects Stampin Up
    • Sakura Gel Pen in "Clear Star" to create the shine on the computer and phone screens.
    • Martha Stewart Circle Cutter
    • Circle punches
  • Print and cut all the shapes you will need. I cut them all at 1.2
  •  Put the "items" together


  •   Print pattern on 12x12 cardstock. Make the card base with it.
  • Cut and emboss a circle. Frame with foil. Place piece in center of card.
  •  Punch out circles and attach "items". Glue the circles on the round foil frame.
  •  Add golden stickers for the year:2011.

It has been an honor having you stop by. :)

Saturday, May 7, 2011

Mother's Day Tags


Hello everyone !!! I have been so busy this week. In addition to paper crafting, I like to do many other crafts, and I just took up soap making !!! LOL I have been making soaps all week and will be making salt scrubs tomorrow, to give as Mother's Day gifts. I have made some tags that I will be hanging on the gift bags with my homemade bath goodies.
I got such a pleasant surprise this week: ENJOY THE SEASONS cartridge !!!! :D I have been wanting this cartridge since the day I bought my Imagine on it's day view on HSN. Yaaaaayyyyy !!!!! I made two of my tags with my new cartridge.
  • RECIPE:
  • Print and cut the pieces needed


  • Cut the tags and put them together


HAPPY MOTHER'S DAY