Wednesday, September 29, 2010

Cricut Imagine: The Second Project- It's a Girl! card / El Segundo Proyecto: tarjeta- Es Una Ni~na !


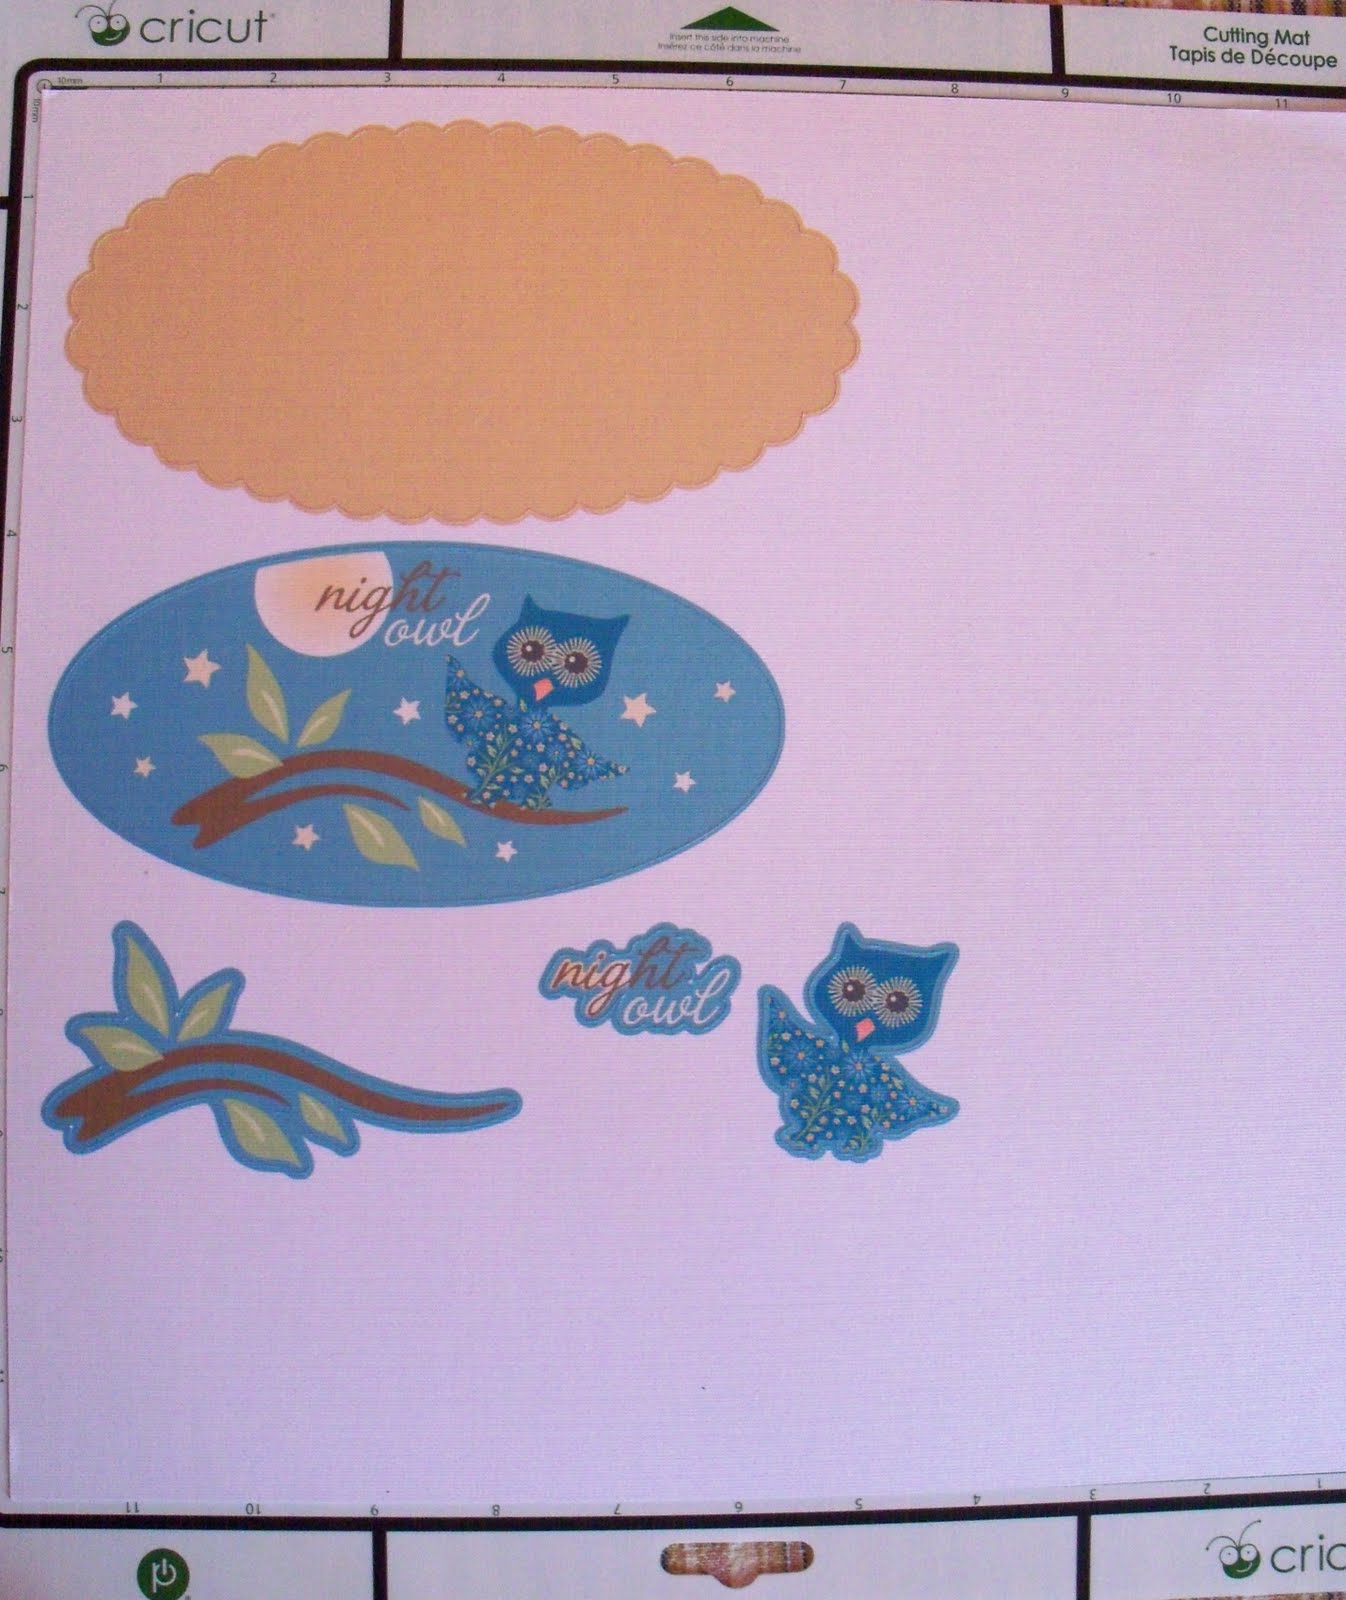
I love my Cricut Imagine ! Here is the cutest baby girl card I made !!! It took more time to decorate and emboss the card, than what it took me to actually design and cut the images for it. So, in just a few simple steps, this beautiful card was created.
**** Adoro mi Cricut Imagine !
  • cartridge used was: (** El cartucho usado fue:)  Nursery Tails art cartridge
  • Images were cut at: (** Las imagenes se cortaron a:)  4.5 inches
  • The brown round scallop "shadow" was cut at 4.7 inches (** El circulo marron festoneado se corto a 4.7 pulgadas)
  • Dimesional foam dots were used to create the layering effect (** Para crear efecto de relive en las capas se usaron almohadillas dimensionales)

  • Stickles were used for the bird and lamb's eyes (**usado para los ojos)
  • Gelly Roll Clear Star (Sakura) pen was used to highlight the word "GIRL"
  • Cuttlebug embossing folders were used to emboss card;Swiss Dots and Divine Swirls. (**Se usaron para crear el relive en la tarjeta)

Friday, September 24, 2010

cricutsearch.com, the place to go when you need "that" shape / cricutsearch.com, el lugar para buscar "esa" imagen que necesitas


Have you ever tried looking for "that" specific image" to create a card or LO ??? ... Has this "search" become  the hardest and most time consuming part of your project ??? ... Have you gone berserk flipping through Cricut booklets and putting it down in frustration, just to take a break  and then  go back  looking??? Well, no more going through that with the new cricutsearch.com

cricutsearch.com is your best search tool ever when looking for a shape to cut.


*** Has tratado desesperadamente de buscar una imagen especifica para hacer una pagina de recuerdos (LO) o una tarjeta ??? Te ha ocurrido que esta busqueda se convierte en la peor parte de tu proyecto y la mas tiempo que te ha consumido ??? Te has vuelto loca buscando en tus libritos de los cartuchos de Cricut ... descansando un rato, para luego reanudar la busqueda de "esa imagen" ???
Bueno, ya no te volvera a pasar, porque ahora existe cricutsearch.com

cricutsearch.com es tu mejor herramienta de busqueda cuando necesites encontrar algo para cortar.

This is what happenned when I searched for a pumpkin, my pick of the patch:
*** Esto fue lo que ocurrio cuando busque la figura de una "calabaza":

  • 42 options to choose from. (**42 opciones para escoger).


  • Each option with: (**Cada opcion con:)

    • the name of the cartridge (**el nombre del cartucho)

    • a picture of the page of the booklet containing the "shape" (**una foto de la pagina del librito que contiene la figura)

    • the number of the page of the booklet (**el numero de la pagina de la figura)


  •  

  • When I choose an image of my beloved pumpkin to see up close, this is what I got. If you still want to check out other images to make sure there is not a better looking pumpkin than this one, look at the bottom of the page and you will see a sequence of booklet pictures of pages containing pumpkins or, you can go back to the thumbnails page.

  • ** Cuando escogi una imagen que me parecio que seria MI calabaza, esto fue lo que ocurrio. Si aun deseas ver otras calabazas, al final de la pagina hay una secuencia de fotos de paginas que contienen la imagen y puedes escoger una para mirar. Tambien, puedes regresar a tu pagina anterior.)                


  •  

  • And, If you feel like you just want to sit back and enjoy the show, TURN ON THE SLIDESHOW, and right there, parading  before your eyes, one by one, you will see a picture of each page of the booklets that contain the image or word you are looking for. Now, how cool is that !!!! :) 

  • *** Si quieres recostarte y disfrutar de un "show de diapositivas" puedes hacero !!! Veras desfilar ante ti, una a una, fotos de todas las paginas que contienen esa figura que andas buscando. Cuan divertido y facil, verdad !!!!

Wednesday, September 22, 2010

Cricut Imagine: The First Project / Cricut Imagine: El primer Proyecto


Hello everyone !!! I am thrilled to have the Cricut Imagine !!! When the machine printed and cut the images and layers (all at the same time) that I needed to create my first project... I just couldn't believe my eyes !!! OMG ... the excitement... !!! LOL And in just a matter of a couple of minutes, I was pulling out the finished cuts out of my mat, all ready to be layered, blinged and glued to a card, LO or, like I choose, a wood plaque.
I made this "Night Owl" wood wall hanging, for my daughter Diana, who really is a night owl. She goes to bed after 2:00am every day, either studying or partying. I hope she likes it (she better... LOL). Cricut Imagine, my new love !!! :)

What did I use to make my project??? Here is the list of materials:
  • Cricut Imagine cartridge: Nursery Tails
  • 12 x 12 white cardstock
  • 2 Swarovski crystals for the owl's eyes
  • Ranger Stickles (Stardust) for stars
  • Stampin Up ink pad (color:Suede) for inking borders
  • oval wood plaque
  • brown Apple Barrel by PLaid paint.
These are the cuts:

Here are more views:
Note: the brown background is paint.


Thursday, September 16, 2010

The new search button: CricutSearch.com / El nuevo boton de busqueda: CricutSearch.com

Finally, CricutSearch.com is a real search button for us crafters who use the Cricut and sometimes are in desperate need of a specific shape/image to use on a precious craft and can't find it, after spending valuable time looking for it. Many times, we rely on the search buttons of our Cricut Design Studio or Gypsy to end up putting it down in despair, because eventhough we know that there are many pumpkins or ghosts images to check out, the DS or G will only give you two or three choices.
Check out CricutSearch.com and explore the possibilities. You will be happy I told you :)

**** Finalmente, en CricutSearch.com tenemos un boton de busqueda real, para nosotros los artesanos que usamos la maquina Cricut y perdemos tiempo en la busqueda de una imagen o figura especifica para crear un proyecto y no la podemos encontrar. Muchas veces, recurrimos a los botones de busqueda de el Cricut Design Studio o de la Gypsy, para eventualmente decepcionarnos porque sabemos que hay muchas imagenes de calabazas y fantasmas, pero estas maquinas solo te mencionan dos o tres.
Por favor, entren al sitio web CricutSearch.com y exploren las posibilidades. Van a estar muy felices de que yo les diera esta informacion. :)

Wednesday, September 15, 2010

Halloween Pumpkin card-Paper Doll Dress Up / Tarjeta de Halloween de Calabaza


The Holidays are coming!... The Holidays are coming !!!! hahahah I already feel I am behind on my Holiday prep schedule !! Well, here is a very simple Halloween card, made with the pumpkin on the Accesories 1  button on Paper Doll Dress Up  Cricut cartridge on page 52.
  • Cut all the pieces. I cut the pumpkin twice: one in orange and one in green
    • Cut out the "stems" on the orange pumpkin.
    • Glue the orange pumpkin on top of the green one.
    • Add googly eyes to pumpkin
    • Go over the score lines with a marker

    • Oh, and by the way, "Que tal ?" means: What's up ???

Tuesday, September 14, 2010

Winner of Blog Candy: KiDS JusT WaNT To HavE Fun blog hop!!! And the name is ...........

Hello everyone !!!!! The winner of the blog candy for my post on the KidS Just WanT To HavE Fun blog hop is: Rosy C at www.sweetdelightspapernmore.blogspot.com/ . Congrats Rosie and thank you everyone for all your kind comments !!! {HuGs}

Friday, September 10, 2010

Sponge Bob Clear Plastic Toy Box for KidS JusT WaNT To HavE FuN blog hop.

HI !!! If you just got here from seeing Momo's project, then you are on the right track !!!
***Hola!!! Si vienen del blog de Momo, van muy bien!!!

It is so true that "Kids Just Want to Have Fun" !!! ... And that is the way it should be. The children in our lives are little angels that bring us so much joy and happiness !!! I invite you all to make their world a little piece of heaven here on earth :) My little ones are all grown now, but in my heart.... they know they still are and will always be my little ones. One of my "little ones", my oldest daughter Cindy, has her own little one !!! ... go figure ! It is for her baby, Santiago, a very active and playful 27 month old toddler, that I made my project: a much needed TOY BOX. I hope he now can put away most of his toys when he is... done playing ???? Like thats ever going to happen !!! LOL
The toy box is made out of clear plastic, so that the child can easily find what he is looking for. I will throw away the lid that came with the box, as it could be a suffocation hazard if the child gets trapped inside. All cuts were made with vinyl.


To make the Toy Box you will need:
***Para hacer la caja de juguetes necesitan:
TIP: If you do not have a color of vinyl that you need, simply color a piece of white vinyl with acrylic paint and let dry.
***TIP: Pueden pintar vinil blanco con pintura de acrilico. Deje secar bien antes de usar.


Let's do it:
***Como hacerlo:
  1. Adjust your Cricut machine to: pressure at 3; blade depth at 4.
  2. Design your layout on your Gypsy and cut and arrange pieces of vinyl on your cutting mat, using the colors that correspond to the images to be cut. NOTE: If you do not have a Gypsy, no problem. Just place the colored pieces of vinyl where you plan to cut the shape.


  1. Remove excess vinyl from your cuts, leaving only the vinyl image to be transfered to the toy box. (***Remueva el exceso de vinil, dejando solo la pieza que va a usar).
  2.  Layer your images at this point, if necessary. The completed layered images should look like store bought stickers. It is best to use tweezers to transfer small pieces for layering. Transfer larger images with transfer tape. (You should only be transfering the vinyl, leaving the paper backing behind). (***Monte todas las piezas o capas de vinil necesarias para hacer su figura. Transfiera las piezas peque~nas con pinzas y las grandes con "transfer tape". Solo ransfiera a la caja de juguetes la pieza de vinil, dejando atras el papel blanco).


  • Once all the sticker-like shapes are done, begin transfering them with transfer tape or with your hands, to the plastic box.
    • I did the background first: the sand and the water (waves).
    • Where to place the rest of the vinyl cut outs is up to you and it is so much fun !!!
BLOG CANDY: To qualify to be the winner of a $15.00 Gift Certificate good to purchase from Oh My Crafts, just leave a comment under this post. The winner will be chosen using random.org on Tuesday morning.
***PREMIO: Para participar en el sorteo de un Certificado de Regalo de $15.00 para usar en Oh My Crafts, deje un comentario en la seccion de "comments". El ganador sera electo el martes usando random.org.
    Now, let's hop on to http://scrappin3rdeeschik.blogspot.com/ to see what  fun project Meighen has  for us to enjoy !!! {HUGS}


        KinderStampO's Kids Just Want to Have Fun Blog Hop

        Tuesday, September 7, 2010

        Tennis Champion Boy's B Day Card / Tarjeta de Cumplea~nos Ni~no Campeon de Tennis

        I made this card for a little boy who turned 5 last Sunday. The grandfather requested it be with a tennis sport theme, because the child is learning the sport and looks like he not only likes it but, is very good at it.

        Monday, September 6, 2010

        Two Altered Notebooks for Fall / Dos Libretas Decoradas para el Oto~no

        Hi there !!! My youngest, Diana, is a student at the University of Puerto Rico. She is majoring in Public Relations and Publicity. She doesn't craft much but loves for me to make her "stuff"; then she heads off to school and brags on how pretty her notebooks are and how unique they are. Many times her friends will ask me to make something similar for them!!!  This time, I decided to make something related to nature and to the fall season. She LOVES owls and mushroom images, so that is what I did. Needless to say, she was ecstatic when she saw the end product. :) ~~Oh, I forgot to say, she is taking a class on Jewelry Making" as an elective course this semester at the university !!! WhaaaaaaaaT ????? Now, that's MY GIRL !!! Love you, Di !!!!